Monday, August 19, 2013

What's Cooking? Chicken and Carrot Cake Jam??? (Better than It Sounds!)

At my last CSA pickup, in which I came home with a red watermelon, a yellow watermelon, and a cantaloupe, I perused the farm stand offerings of local jams, jellies and preserves by Olney Natural.  There were a lot of the 'standards' - strawberry, blackberry, rhubarb - but there was also a "carrot cake jam" which sounded both interesting and awesome.  I especially liked the sign accompanying it, which said "Don't let toast have all the fun - try with meats and cheeses!"  Naturally, I couldn't resist picking up a jar.
Friday was a really hectic day for me - my daughter's daycare provider was sick, so I had both kids, I had a make-up arts & crafts club meeting from when I was sick to run, and I just felt tired.  I threw a few chicken breasts, carrots, frozen corn and frozen peas in the crockpot with some stock and just let it go, because that was about all I had energy to do.
When it came time to actually serve the crockpot food (over quinoa - one of the few non-pasta grains my son likes), I remembered the carrot cake jam and heated up a few tablespoons to top off the meal.
The finished product
It was DELICIOUS.  The carrot cake jam added a subtle warm/sweet/autumnal character to my otherwise (admittedly) bland meal.  TMS was totally impressed, so I consider this dinner a success.  I'll be picking up more jams next time I go to the farm. 

Friday, August 16, 2013

A Wardrobe for Autumn

August is, in general, not my favorite month.  In fact, it may be my least favorite month - Mother Nature assaults me with every possible allergy-inducing pollen and I spend the entirety of the month with watery eyes and a stuffy-but-also-runny nose.  The only redeeming feature of August, as far as I'm concerned, is that it means fall is on the way. 
I love fall.  I adore fall. Pumpkins, apple cider, changing leaves, and cooler temperatures - excellent.  To me, there is nothing better than pulling the cardigans and boots out of the closet.  We've had a few cool mornings here, and I'm already geeking out for autumn and all my yummy warm clothes.
My friend Mariah recently mentioned that she was sewing a fall wardrobe - a few dresses, skirts, shirts, and pants - and it got me to thinking about my cold weather clothes.  I don't really have a cohesive non-work wardrobe, mostly I purchase things that catch my eye without much thought into how it fits in with everything else.  I don't necessarily need a TON of clothes, but  I'd love to have a go-to set of casual (yet stylish) clothes that work together, and I think sewing a few pieces would be a great step in the right direction.

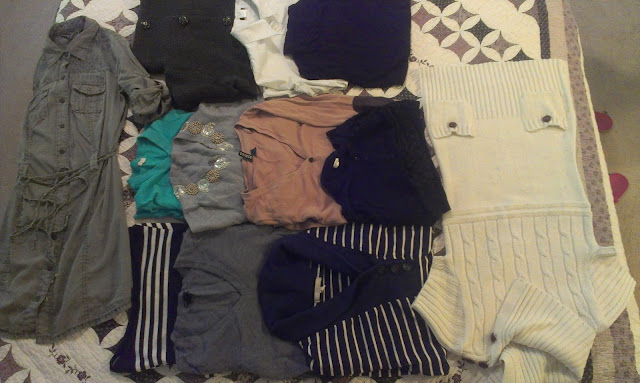
I started by taking an inventory of what I already have:
3 skirts, 2 pairs of trousers (1 pair cropped), 2 pairs of jeans (1 pair suitable with heels only), LOTS of stockings & tights
5 cardigans, 2 tunic-length sweaters, 1 dress, 2 oxford shirts, 2 pull-over sweaters.
As you can see, I own a lot of stockings and tights, but not many skirts or dresses.  I also own quite a few cardigans, but very few pieces to go underneath.  Also, I have no fall-weather jacket.  My old jacket has seen far better days and needs to be retired.

So this is the plan: make a jacket, two skirts, a pair of pants and two dresses.  I already have fabric for the jacket and a fabric that could be for a skirt or pants - just not sure which one yet.

I've started a Pinterest board of patterns and fabrics I'm considering for this endeavor.  Check it out here. 


Monday, August 12, 2013

Knit that WIP: My Secret Chemise

This weekend was kind of slow for me craft- and cooking-wise, so I thought I'd start this week by sharing a WIP (Work-in-Progress) knitting project.  Sometimes, it seems like my WIPs are more like Works-in-Purgatory.  I hope I'll finish them...eventually.  Right?  Right???

Last November, my mom bought me The Ladies of Mischief's book of Steampunk and Victoriana knits, Needles & Artifice, for my birthday.  All of the patterns in the book are awesome and I plan to make all of them.  One in particular looked like the perfect starting point toward that goal.  The pattern is called The Hush Chemise by designer Amanda Williams.  Look at these photos from the book - the model just exudes elegance and refinement.


I had a skein of Handmaiden Fine Yarn's Mini Maiden on hand that I knew would be perfect for this chemise, although the yardage is less than what's needed.  Mini Maiden is a 50/50 wool and silk blend and is the softest yarn I've worked with and my new fave.  It is perfect for really lush, delicate projects like this one.  The colorway I'm working with is called 'Apricot' - a subtle variegated yarn with shades of cream and rosy peach.   It is worked from the top down, in the round.

I started this project back in December 2012, I think.  I believe I was working on it during our annual holiday drive back to Michigan.  I made a couple of errors in the lace pattern and had to frog it a few times, but once I got to the armholes I felt like I was really making progress.  Then, the stockinette portion began...and it never ended...and I'm still working on it.  The logical part of my brain knows that I must be making some progress, but at 10 rows per inch, it's difficult to see.

My current progress - if you can call it that.
I haven't worked on this project continuously - I've done lots of other, smaller knitting projects along the way - but I think I still have 7 or 8 more inches to go.  I'd love to finish this before winter to wear underneath my sweaters - we'll see if that happens (I'm not holding my breath).  Maybe when I finish this I'll finish the leather underbust corset/waist cincher I have sitting in my project bag...

Do you have any projects that just seem to go on endlessly?


Friday, August 9, 2013

Super superheroes!

Do you ever have a moment where fabric calls to you?  By 'calls' I don't just mean the impulse to BUY ALL THINGS when you walk into a fabric store (because that happens to me all. the. time), but that moment when you see a fabric and know that you must have it, and know exactly what it's going to become.  I had one of those moments a couple weeks ago when I was perusing the Jo-Ann's weekly direct mail flyer, of all places!  Usually I just browse to see if there are any big sales on patterns or arts & crafts supplies - I run a weekly small group arts & crafts club - but I rarely look at the fabrics.  I'm afraid years of going to quilt stores with my mom has turned me into a bit of a fabric snob.  At any rate, there was a sale on licensed fabrics including Marvel superhero fabrics.  I saw this one and knew it was destined to become a dirndl skirt.

Avengers and uh...other Marvel heroes - assemble!
Coincidentally, Gertie has a great dirndl skirt tutorial over at the Blog for Better Sewing, so I just had to buy the fabric.  On my son's suggestion, I paired the fabric with a gold zipper, which I think gives it that little bit of extra superhero bad-assness (bad-assery?)

I bought 2 yards of fabric, which was more than enough for my project. The fabric is 44" wide, which means I was able to cut two strips the width of the fabric and 27" high.  I cut two waistband pieces 30" long and 2" high.  I hemmed the skirt to 22" - the deep hem lets the skirt hang nicely.

Here's a pic of the finished result:

I had quite a lot of fabric left over - I almost always buy extra - so I decided to make a pair of shorts for my son.  All of my children's patterns are for babies and toddlers, which, despite my delusions to the contrary, he is neither anymore (hello first grade!)  I found a great tutorial on drafting boys' pants based on a pair of existing pants over at Schwin &Schwin.  I grabbed a pair of my son's pants, busted out a roll of the kids' art paper and got to tracing.  I widened the leg openings a bit, as I'm pretty sure that even though skinny jeans are 'in', skinny shorts are not.

One of my favorite things about the Schwin & Schwin tutorial is the faux fly detail.  One thing I really didn't want was for these shorts to look like pajama shorts.  You know the kind - one pattern piece per leg with a fully elasticized waist.

My son is at the age where he loves to have pockets for his "treasures" - pennies, acorns, rocks, etc. - so I added some front pockets.  I had some left over binding from my walkaway dress, which I though would make a fun pocket, belt loops, and waistband accent.


These shorts were quite quick to make, they took me just over two days.  I probably could've cranked them out in one if I would've been kid-free for a day.

Here's the "modeled" shot of the shorts...
He wasn't really in the mood to have his picture taken.

...and here they are in action on the way to the National Aquarium. 

Siblings striking a pose.

Now, I just have to be careful that we don't accidentally go all matchy-matchy, since my skirt and his shorts have become our "go-to" wardrobe items.  Of course, this has already happened, but I'm trying to keep it to a minimum.  I will say that the skirt has become quite the conversation starter - I wore it on a date night with TMS and got many (positive) comments from passers-by, and when I wore it to Jo-Ann's the other day, I gained a fan in a little nearly-3 year old boy there with his mom to buy fabric for superhero capes - he was having a superhero themed birthday party.  And really, how can you NOT feel awesome wearing this type of skirt?

My next thought is to do a whole Avengers-themed series of dirndl skirts...is that overdoing it?  I don't think so!  As a bonus, I get to represent Antman and Wasp, who were totally left out of the Avengers movie franchise (for shame, Whedon!)


Wednesday, August 7, 2013

What's cooking? Tomatoes!

TMS and I belong to this awesome CSA - that's Community Supported Agriculture, not Confederate States of America.  The farm is just a few miles from us and not only do we get great produce as our weekly share, but they also have a farm stand where you can buy produce and goods from local merchants.  Last week, in addition to picking up our weekly share (hello, watermelon!) I purchased a 25 lb. box of "seconds" tomatoes from the farm stand and over the weekend I canned some tomato sauce.

To start, I boiled the tomatoes for about a minute, then plunged them into ice water.  This makes it easier to remove the skins.  After skinning them, I cut them in half width-wise and squeezed the seeds and extra water out, then threw them in a strainer to get even more water out.  I had to do all of this in batches - 25 pounds of tomatoes is a LOT of fruit and made quite a mess of my tiny kitchen.
This part of the process left my sink looking like a crime scene.
 After skinning and draining (sounds gruesome!), I cut out the tough spots by the stems, quartered the remaining pieces and threw them into a large pot.  I turned the stove on to about medium heat and let the tomatoes do their thing.  I found that with so many tomatoes, I had to wait for some of them to cook down before I could add more.  I did not, however, have to mash them at all - the cooking made them just fall apart. 


I let my tomatoes cook for about 4 hours, which reduced it by about 1/3.  Then, I followed the instructions on canning as found on Pick Your Own.  If you've never done any canning, or if you're like me and it's been a while, I highly recommend you check out Pick Your Own.  It is a great resource for not only canning/pickling/jam-making recipes, but also tells you when different types of produce are in season.  Here are my delicious pint-sized (literally) results:
Delicious!
I ended up with a total of 4 pints canned and 3 pints of rough chopped tomatoes I bagged and threw in the freezer.  I had one extra jar that I couldn't fit into the pot, and I was not about to do a 45-minute water bath for one jar, so I just threw that one in the fridge and used it the following day for pasta sauce.  So yummy!

This summer, I've made strawberry jam, pickled turnips, two varieties of pickles, and now these tomatoes.  I'm looking forward to apple picking in the fall for applesauce.  What are your favorite things to can/preserve/pickle?

Monday, August 5, 2013

Conquering the Walkaway Dress

If you like mid-century fashion and you like sewing,  you've probably seen the Butterick 4790 pattern, also known as the Walkaway Dress and originally numbered as Butterick 6015.  A wrap dress in 3 pieces with only 3 seams this dress was originally released in 1952.  According the the Vintage Patterns Wiki,

"...[I]t was dubbed the 'walk-away' dress, because it was so easy you could "Start it after breakfast... walk-away in it for luncheon!".
It's simple yet flattering wrap design and easy construction were what made it so popular. Sales of the pattern were so great, that at one point manufacturing of all other patterns ceased, and only the 'walk-away' dress was produced until all back-orders for this dress could be filled."
 One look at the pattern's front illustration and you can understand why this dress was a phenomenon unto itself - it looks effortlessly elegant.

I mean, look at the girl in the blue version - she's like Elizabeth Taylor going to the farmer's market.   The girl in the black and white dress looks so chic and polished (and OMG the gloves!!)  To achieve that sort of glamour with a pattern billed as "Quick & Easy", well who wouldn't want to make this???

Unfortunately, the photo accompanying the reissue of this pattern isn't nearly as flattering...

This is either the world's fanciest hospital gown, or fluffiest apron.
Despite the questionable image above, I was determined to make this dress.  I read a lot of reviews from other home sewers and found all sorts of fit issues.   Luckily, I happened on a great tutorial on how to make a finished garment that looks like the pattern illustration on Edelweiss Patterns' blog.  I bought a fun cherry print fabric in a cotton/poly blend from Amazon - the black was not as saturated as I would've liked, but the fabric had a really nice, crisp hand, which worked very well for keeping the circle skirt flared without the aid of a petticoat. 

How retro!  How fun!
I made the modifications suggested by Edelweiss Patterns - turning all biases to the inside, redrawing the upper back piece to taper out in a diagonal line so that the front closure is less of a U-shape (as the above photograph shows) and stays true to the V-shape of the original drawing - and also made a number of modifications of my own. 

First, I took ~2 inches off the front piece at the waist.  I'm quite short waisted and found that when I wrapped the front piece, it closed below the narrowest part of my waist.  This resulted in a bizarre (and unflattering) shifting of the front up, so that the shoulder seams were actually sitting above my shoulders.  Speaking of shoulders, I also rounded the shoulder seams, taking in 1/2 inch at the collar side and increasing to 1 inch on the arm side.  I had read another review of this dress where the dress wearer complained that the dress kept pulling back, which the sewer contributed to the weight of the circle skirt being much heavier that the front sheath piece.  There may be some truth in this, although I found my alterations solved this problem.  Just to be sure, though, I finished the circle skirt with a very narrow hem, but the front with a deep hem, to give it a little extra weight. 

Here's the finished product on Colette, my dress form (please excuse the mess):


After taking the dress out for a test drive, I realized that even though I had added an extra snap to the front closure (bringing the total to 4 snaps), I still had a near wardrobe-malfunction when setting my toddler down.  Luckily, this was easily remedied by a hook-and-eye closure. 

Hook-and-eye and four snaps - do you think I'll set off a metal detector?
All in all, this is definitely a pattern I'd make again, and has garnered tons of compliments from strangers. 


Friday, August 2, 2013

Bow-tie Blouse Remixed

It is a well-known fact that I have a huge crafting crush on Gretchen Hirsch of Gertie's Blog for Better Sewing.  Recently, my mom bought me her book, Gertie's New Book for Better Sewing, which I think we are supposed to be "sharing."  Sure.  At any rate, I highly suspect that I will make every pattern in the book over the next year or so.  I've already done the Portrait Blouse - I may post it later, but it was a very straightforward pattern and a quick project.

This post, however, is about the Bow-tie Blouse.  For this project, I poached an old shirt from my husband's Give-to-the-Goodwill pile.  He bought this shirt at least eight years ago - he wore it on our honeymoon - from H&M.  I chose this shirt to upcycle because a) it's beautiful and b) it already has buttonholes done (what can I say, I hate doing buttonholes!)

Obligatory "before" pic.


I started by ripping apart the shirt at the side seams and removed the collar and sleeves from the body of the shirt.  In my enthusiasm to get to work  - and no, I did not do a muslin of this shirt, shame on me - I neglected to actually make sure the fabric was wide enough at the upper shoulder to accommodate the pattern width.  Newsflash: it wasn't.

I was a quarter circle short on each shoulder - both front and back.  You can see here where the fabric was missing (under the pins):

Oops!

To fix this, I cut out a new semicircle pattern piece, adding 5/8" seam allowance along the curved outer edge and removing the seam allowances at the shoulder seams on the original pieces.  Here's the new piece pinned:


And here it is from the right side. 


I think it gives a fun little cap/flutter sleeve effect and looks like an intentional design element instead of a screw up - at least, that's what I keep telling myself. 

The other modifications made were to trade out the standard men's oxford buttons for these nice black ones.  I know it doesn't scream "VINTAGE" quite like oversized fabric-covered ones, but it works.


 Also, I had to recut the collar band.  I've never thought of myself as being particularly stout in the neck, but the collar band cut to the pattern specs was a strangling me.  I lowered the neckline by about 1/2" all around and that fixed the issue.  I've read from other sewers that they've had the same issue. 

Here's the shirt in all it's refashioned glory...

My dress form, Colette, modeling for me.
...and here it is in action.
It's me!  And my duck friends!